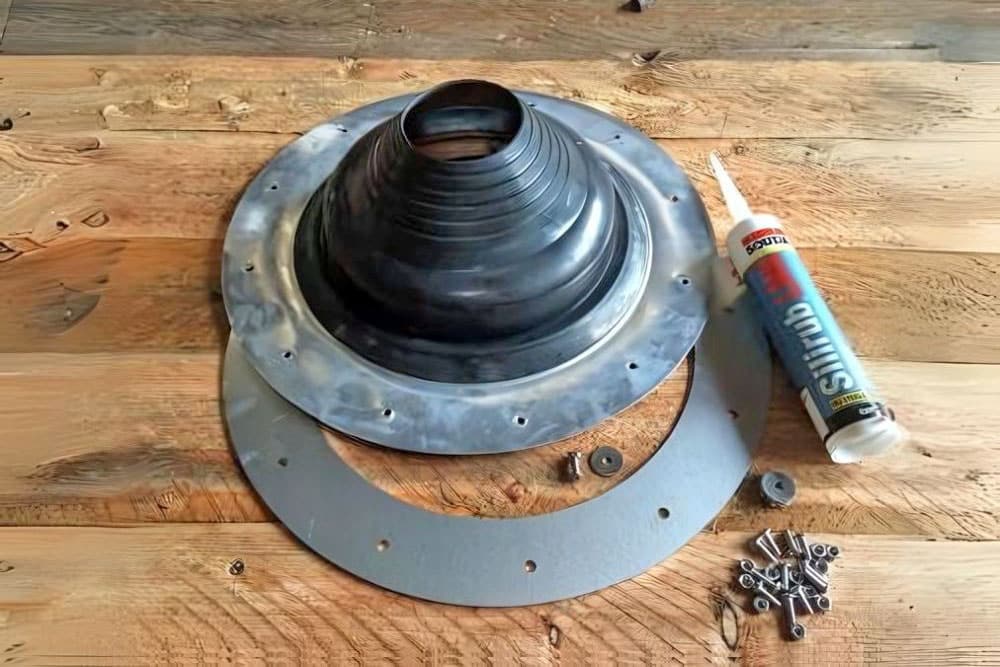
How to Install a Yurt Flashing Kit
Installing a yurt flashing kit allows you to safely pass a wood-burning stove flue through the yurt roof without leaks or damage. This guide explains how to fit one securely using a standard kit such as the Windy Smithy Yurt Flashing.
A properly installed flashing will protect your yurt canvas from heat, rain, and smoke — keeping your space warm, safe, and comfortable all year round.
🧰 What You’ll Need
- Yurt flashing kit (e.g. Windy Smithy Yurt Flashing)
- Wood-burning stove and flue pipe (single or twin wall)
- Drill and screwdriver
- Heat-resistant silicone sealant
- Sharp utility knife or scissors
- Ladder or step stool
- Waterproof tape (optional)
- Gloves and safety glasses
⚙️ Step-by-Step Installation
1️⃣ Plan the Position
Decide where your flue will exit the yurt roof. Ideally, it should sit between the crown wheel and the roof edge, avoiding rafters and guy ropes. Make sure the external flue can rise vertically and be supported securely — use twin-wall sections for safety.
2️⃣ Mark and Cut the Opening
Using the inner ring of the flashing, trace the shape onto your yurt roof canvas. Cut a small X-shaped hole first, then enlarge it carefully until the inner ring of the flashing fits tightly. This snug fit helps prevent leaks.

3️⃣ Fit the Flashing Cone
Slide the silicone cone of the flashing over the flue pipe until it sits in position. If you’re using twin-wall flue, trim along the pre-marked ridge on the cone for a snug fit. The cone should grip tightly around the pipe to create a secure seal.
4️⃣ Attach the Flashing Base
Lay the flexible aluminium base flat on top of the yurt canvas and mark the screen holes, then screw top and bottom rings together, with the fabric layers in between. You may need a small clap to hold it in place when you working on it.
5️⃣ Seal and Secure
Apply another bead of exterior translucent sealant around the top edge where the silicone cone meets the flue pipe, and screw areas. Ensure there are no gaps or creases where rain could enter. For extra protection, add a layer of waterproof tape around the edge of the flashing base if you wish.
6️⃣ Test the Installation
- Light a small fire and check for smoke leaks.
- Ensure the flue stays vertical and stable.
- Check for heat build-up near the canvas and any rain ingress after a downpour.
🔥 Safety Tips
- Maintain clear distance between flue and flammable materials (canvas, rafters, ropes).
- Always use twin-wall flue above the roof line.
- Inspect regularly for movement, wear, or leaks.
- Install a carbon monoxide detector inside your yurt.
📸 Helpful Resources
- Build Instruction Videos – Yurt Specialists
- Best Stoves for Yurt Glamping in the UK
- Stoves, Flashings, and Storm Kits for Yurts
- Windy Smithy – Yurt Flashing Kit (External Supplier)
🌿 Final Thoughts
Installing a flashing kit properly is essential for keeping your yurt both safe and weatherproof. Once fitted, your stove will heat the space efficiently without risk of leaks or burns — perfect for off-grid glamping, eco-retreats, and yurt living.
If you’d like more advice or to purchase a stove flashing kit along with your yurt, feel free to contact Yurt Specialists — we’re always happy to help.
❓ Frequently Asked Questions
Do I need a twin-wall flue pipe for a yurt stove?
Yes, it’s highly recommended to use a twin-wall flue once the pipe exits the yurt roof. It keeps the outer surface cooler and prevents heat damage to the canvas or flashing. Single-wall flue can be used inside the yurt before the pipe reaches the roof.
Can I install a flashing kit myself?
Yes — most yurt owners install it themselves. As long as you follow the instructions carefully, use heat-resistant silicone, and ensure the flue is well supported, it’s a manageable DIY task. We also offer video guides and phone support on Yurt Specialists.
Can I install a flashing on a felt or insulated roof?
Yes, but make sure to cut the felt neatly and seal all layers with heat-resistant